


50 Top Detailing Tips
A full half-century of professional tricks and tips put together specifically to push your detailing to the next level.

 Skip to content
United Kingdom
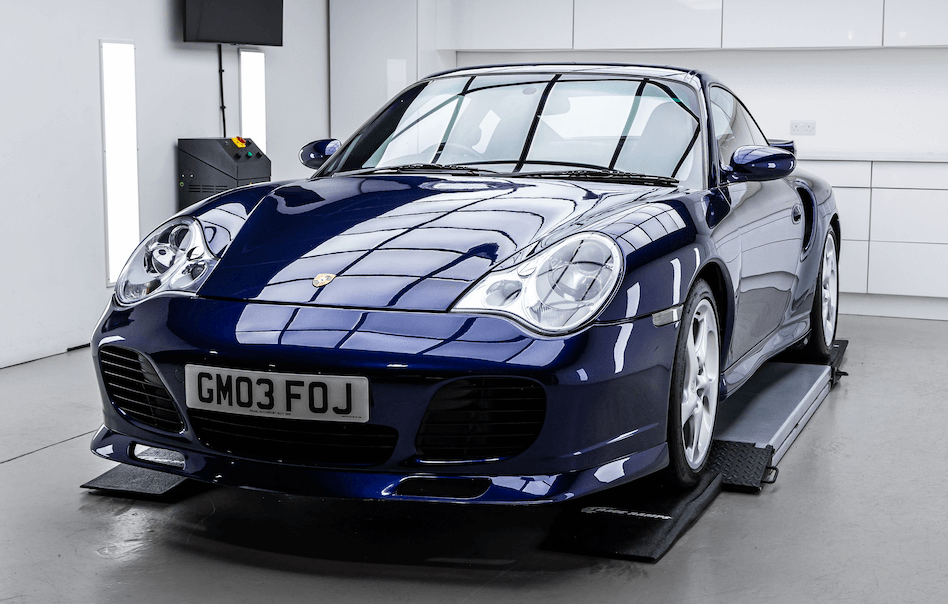
It's no secret that we love a 911 here at the Auto Finesse Detailing Academy, let's just say we've seen more than a couple through the bay in the last few years, and we even have one or two of our own on the AF fleet, too. But, with all that said, there's no denying that the legendary 996 Turbo is an extra special car for all fans of Stuttgart's finest, and this Regal-tuned 996 probably even more so. It's also obvious that a special car like this - especially one that's seen its fair share of use in anger - deserves a special detail, a transformation that includes deep-cleaning, machine polishing and application of the finest wax protection available. Check out the video below and follow along as we complete the job from start to finish...
Pretty cool, right? But even so, we don't have to tell you that a full detail to this level doesn't just happen in twenty-one minutes and twenty seconds. So, we're here to give you a closer look with our in-depth guide to every product used, how we use them, and why…
As with every exterior detail, we start with what's traditionally the most contaminated part of any vehicle - the wheels. Now, the only way to get the deepest of deep cleans - and to give the access to dive into the inner arches and suspension components - is to whip off the wheels at the very beginning of the wash stage. It goes without saying that all the safety procedures apply here, always use a workshop jack and axle stands, and don't take any risks. Remember that, before the vehicle is moved later, the wheel bolts/nuts need to be re-torqued to the correct spec.
On inspection, we can see that these wheels are extremely contaminated, inside and out, with brake dust as well as heavy, ingrained grime. Embedded brake dust is a key problem for detailers and is basically sharp, ferrous metal particles that fly off the brakes when they're hot and stick themselves into the top layer of the lacquer/powdercoat. This iron shrapnel is extremely corrosive and if left on the wheels for long enough, will eat through the paint/powdercoat and into the alloy itself. This type of contamination requires intense chemical removal to physically dissolve the metal to allow it to be freed from the surface, and this is why it's so important not just to clean your wheels on every maintenance wash, but to fully decontaminate them periodically, too.
As always, the level and type of contamination dictates the products we use, in this case our main cleaning agent is Reactive Wheel Cleaner which not only contains degreasers and surfactants designed to break down and lift bonded grime, but also a special metal fallout remover which reacts with brake dust, dissolving the metal into the solution, allowing it to be safely rinsed away. For added cleaning power, and as an extra lubricant, we'll also brush-in the Reactive using Revolution Wheel Soap, so the first bit of preparation is to add a few capfuls of this specialist wheel shampoo to a dedicated wheel wash bucket containing clean water. A quick froth up with a pressure washer and the solution suds up, making it ready to use.
Working on one wheel at a time, the first step is to rinse the whole wheel and tyre inside and out. It's important not to miss this stage because it's here where all the loose grime - the stuff that will come off with nothing but water pressure - is removed. This allows your cleaning agent to get to work where it's most needed, on the bonded and ingrained contamination. It also ensures you're not wasting your cleaning products.
Next, we apply the Reactive liberally over the wheel, almost immediately we can see it start to react. The blood red colour indicates that metal fallout is present and has been dissolved into the solution.
Now we can work the Reactive around the wheel using the Revolution Solution by agitating with a dedicated wash mitt (in this case we're using a Plush Wash Mitt) and a suitable wheel brush (for us, a large Wonder Wool Wheel Brush, which is a soft brush suited to sensitive wheels). The idea of agitation isn't so much to scrub the surface clean, but to ensure that the cleaning agents themselves are spread around and make contact with every part of the surface. Second, agitation is a way of moving away any spent solution (portions of the cleaning agent that have already reacted or are encapsulating the maximum amount of contamination) and replacing it with fresh solution to work on any remaining grime. In other words, agitating simply makes the most of the cleaning products you use. While carrying out this process you can always apply more product on the heaviest grime if you need to.
When deep-cleaning wheels, it's also important to agitate your solution into any small recesses that may have acted as dirt traps. Here the bolt holes and the back of the spokes were particularly contaminated and, while we may not see these in normal circumstances, it's important to remember that they're just as susceptible to corrosion as any other part of the wheel. In this case, due to the particularly caked-on contamination in these areas, a slightly stiffer Hog Hair Brush was used for working in the Reactive solution. Only once every part of the wheel has been agitated is it time to rinse away the grime and brake dust in the solution.
Before the wheel is complete we need to take care of the tyres. Now, unlike wheels (which will scratch if you're too rough), tyres can be scrubbed to remove any embedded grime, road films and the remanence of old dressings. It's also important to use a rubber-safe cleaning agent to help lift and encapsulate the dirt - in this case a few spritzes of Tread Tyre Cleaner and a good scrub with a Rubber Scrubber Tyre Brush will bring all the dirt to the surface and allow it to be rinsed away.
The last step was to rinse the whole wheel again to safely remove the grime encapsulated within the Tread solution, and any that may have been transferred to the wheel during cleaning.
With the wheels off we can also get right into the inner arches and other components such as the brake calipers and suspension. Once again, a good rinse is the first step before any cleaning agents are applied, being sure to flush out any mud and loose grime. In most cases these areas can be even dirtier than the wheels, they're also just as susceptible to brake dust contamination.
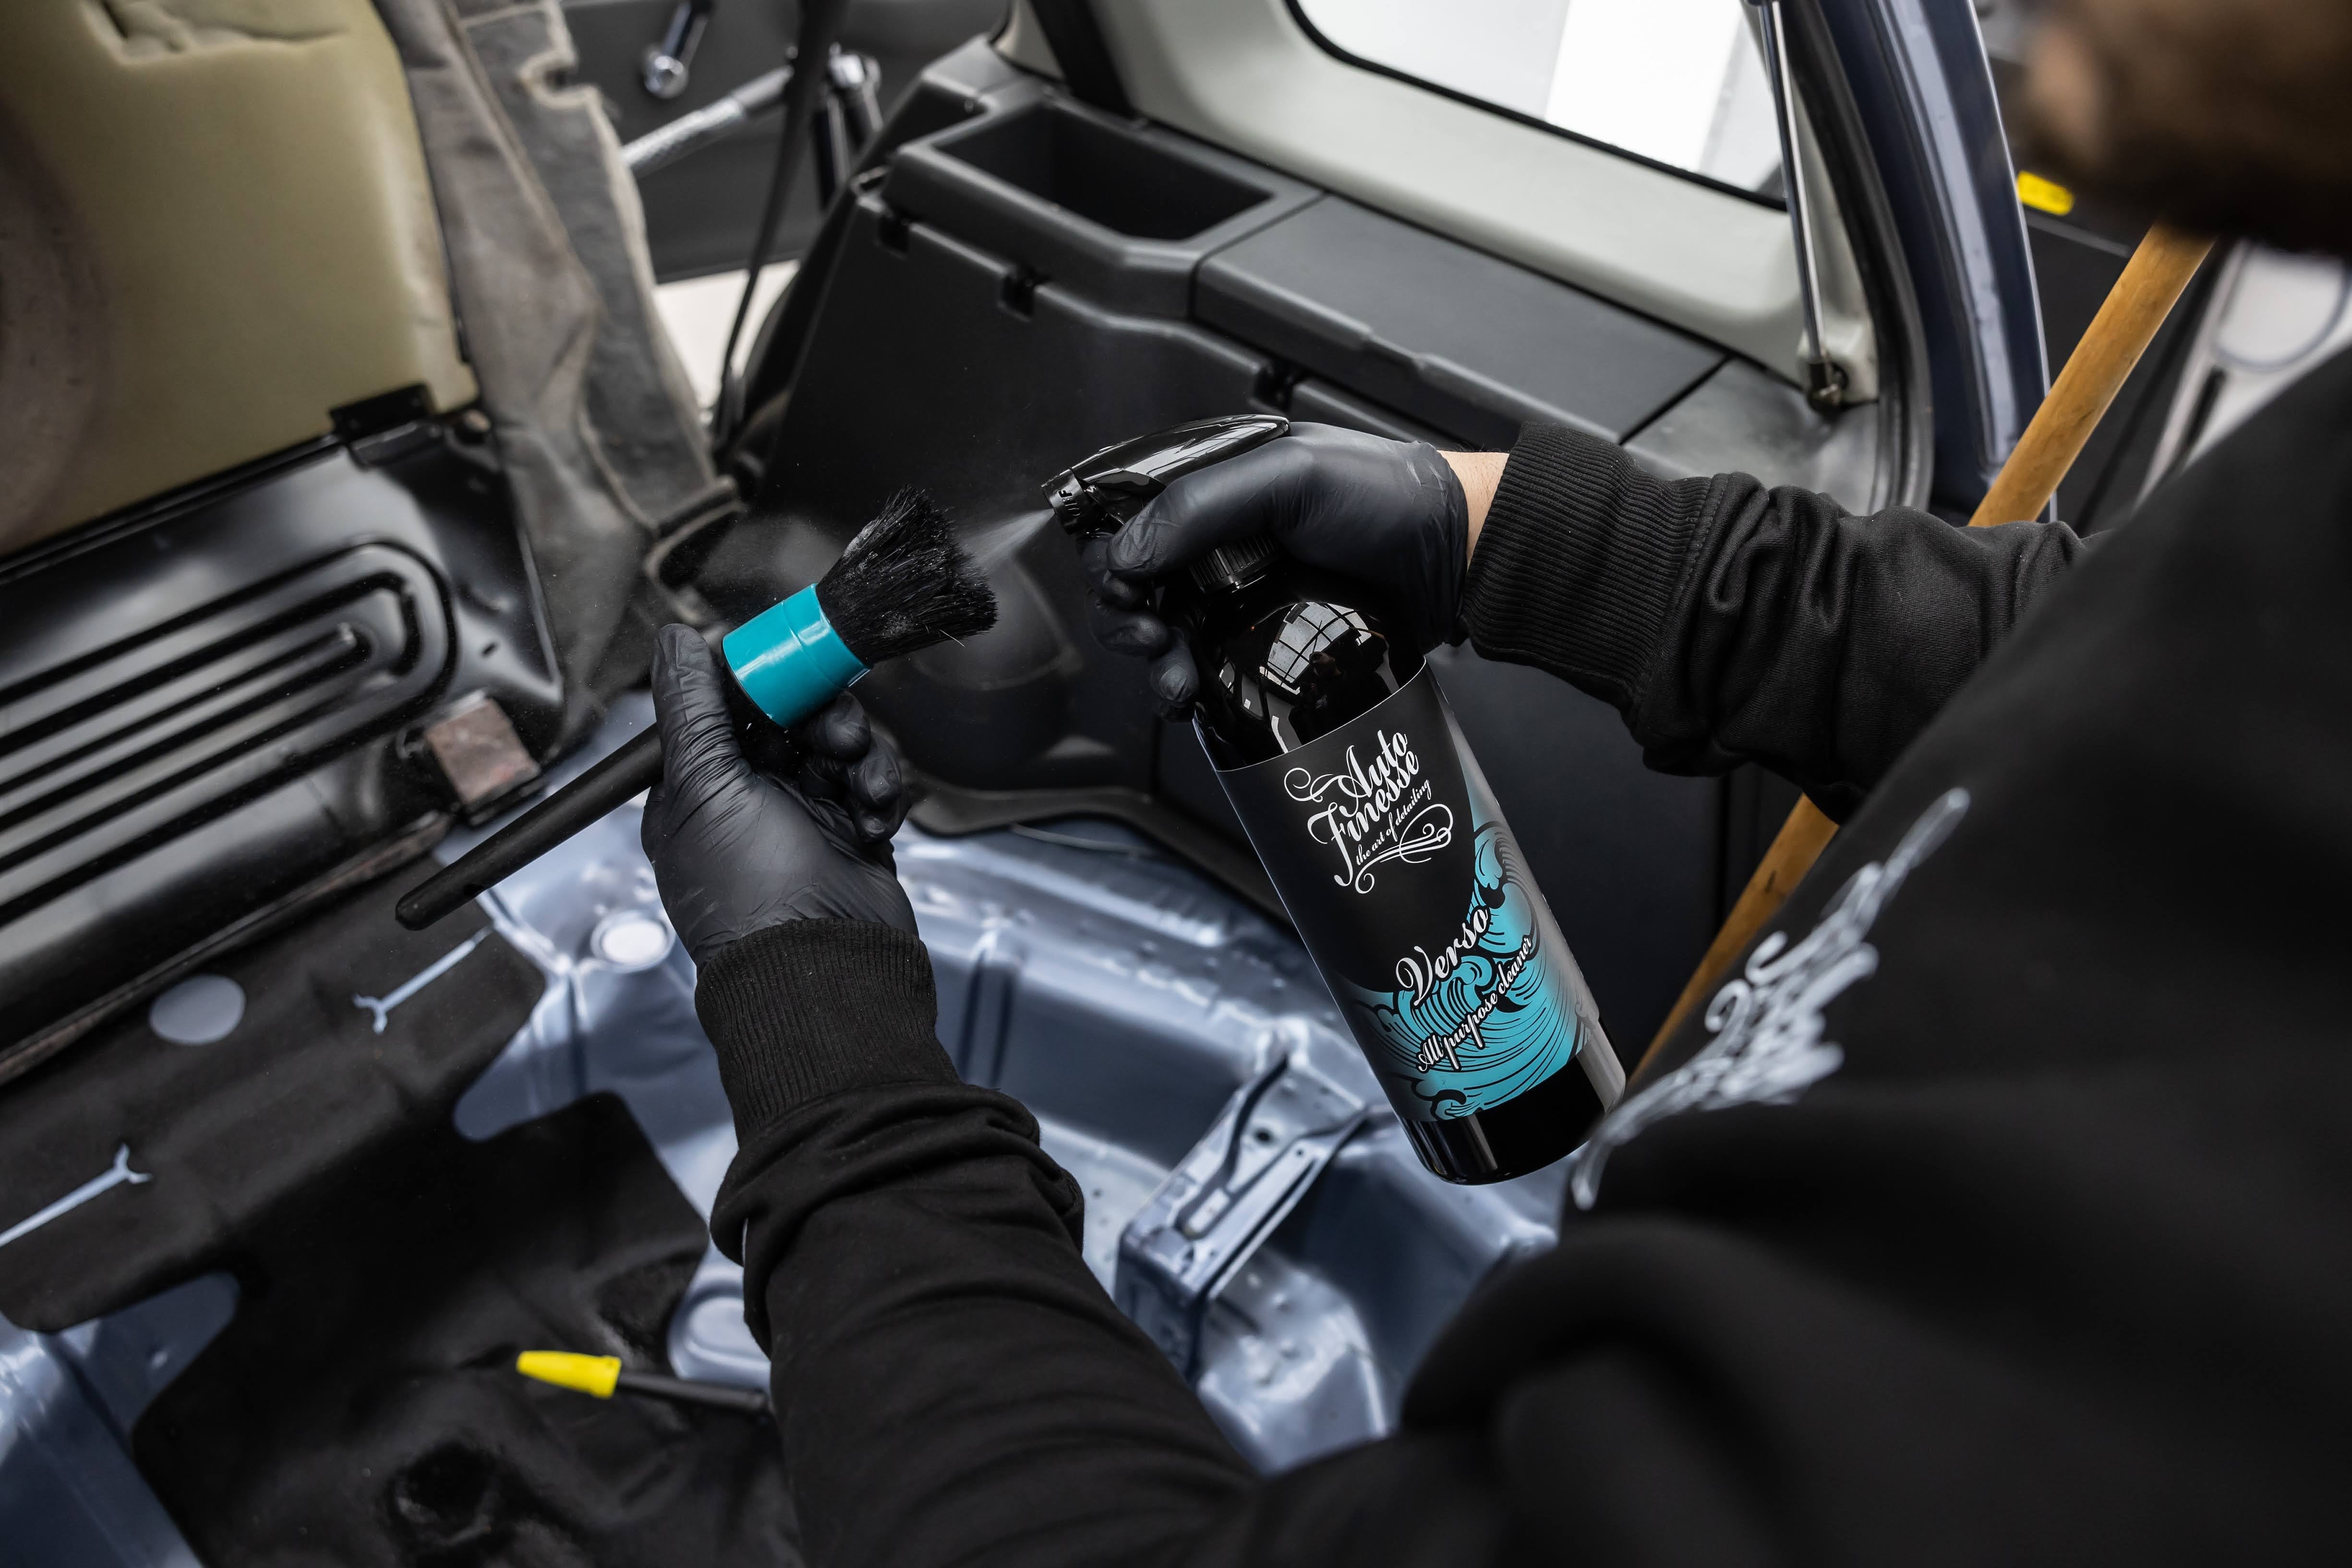
For the inner arch plastics and suspension, which can be scrubbed just like tyres, a of a 1:5 dilution of Verso All Purpose Cleaner is applied liberally and worked in using an Arch Blaster Arch Brush. As well as powerful surfactants, Verso contains heavy degreasers which make light work of the contamination found in these areas. In this case we also used a little Reactive, just to ensure that any embedded brake dust is also removed.
Brake calipers and rotor bells - especially rather posh like the ones here - are a little more sensitive and require targeted cleaning. In normal circumstances we'd be inclined to use Verso or Imperial Wheel Cleaner for this task, but because of the high level of metal contamination here, we opted for a little more Reactive. Again, the idea is to get into every tiny nook with your cleaning agent, our Hog Hair Brush is the perfect accessory to agitate the solution here, before giving the whole lot final rinse down to remove to make sure all the contamination and solutions are removed.
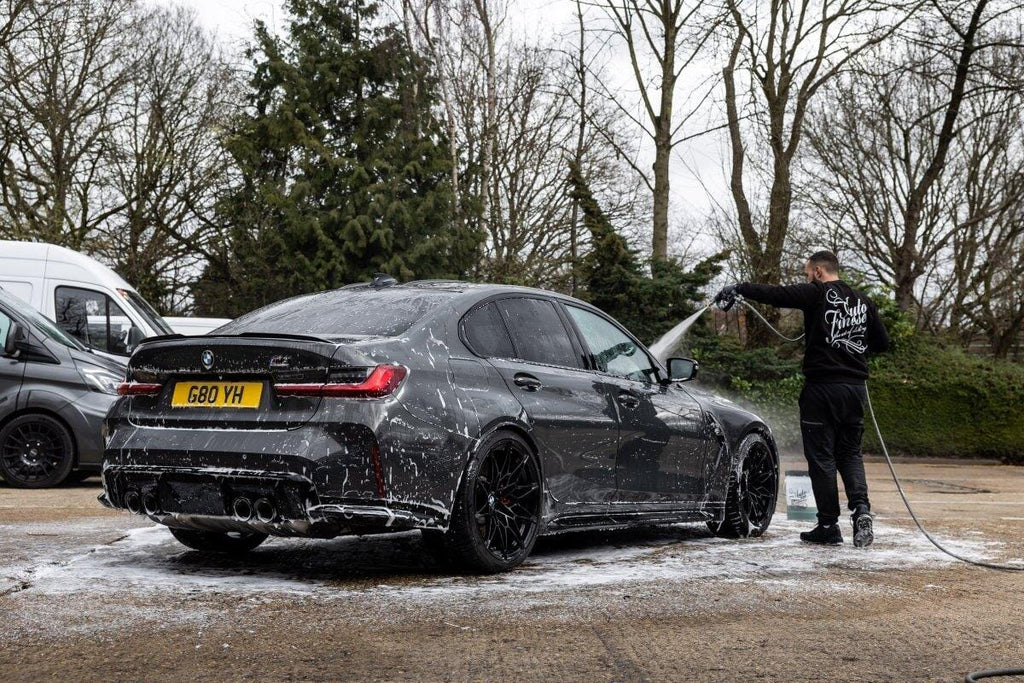
The pre-wash is the stage where we remove the most harmful particulate grime from the rest of the exterior. The idea here is to rid the vehicle of the harsh contamination before we make any physical contact with the most sensitive surfaces like paintwork and gloss plastics, in a bid to avoid dragging sharp, gritty particles across surfaces and inflicting damage such as scratches and swirl marks. It's an important safety measure that should be employed before any contact wash, whether that's on routine maintenance, of a full detail like here.
To remove any loose grime, and again to ensure that our pre-cleaning products are getting to work where they're actually needed, we pre-rinse, making sure we flush out any grilles and panel gaps where there may be hidden, loose dirt. We, aways rinse the whole vehicle from the top down, the idea is to move the soiling downwards and off the vehicle, rather than merely spreading it around.
We also include the boot shuts, inside the filler flap and door jambs in the rinse, before starting on deep-cleaning the most awkward areas a suitable cleaner to lift an encapsulate any grime. On the exterior paintwork, in most cases, we don't agitate our pre-cleaners, as this increases the risk of inflicting light defects on the most noticeable areas. But, on areas such as the door jambs (especially when they're heavily contaminated like here), a little agitation may be needed to help the cleaner lift any heavily ingrained grime. These areas are also typically neglected during routine washes, so you may find a surprising build-up of contamination.
Because of the heavy contamination on the Porsche we used a 1:10 dilution of Verso as our cleaning agent, and agitated into the surface using a FeatherTip Detailing Brush. The ultra-soft bristles help make the most of the degreasers and surfactants here, but minimise the risk of inflicting defects. During routine maintenance you can also opt for Citrus Power Bug & Grime Remover to do this job.
Citrus Power is our choice of pre-cleaner for the exterior of the vehicle, this is applied over every surface and is designed to utilise special surfactants to break down, lift and encapsulate the heaviest particles, allowing them to be rinsed away safely in the solution.
When used during your pre-wash this product has two major advantages over harsh all-purpose cleaners and degreasers. First, it's safe on previously-applied protection layers, meaning that it won't strip away or degrade waxes, sealants and ceramic coatings. And, while that's not as important here, because we'll be polishing and adding protection as part of the detail, it's vital during maintenance washes. To cut down on risk, Citrus Power also removes the heavy soiling without agitation. By misting the product liberally on the vehicle, it spreads itself around and gets to work, it even spreads a little more as you rinse.
This pre-cleaning stage removes the heaviest, most harmful soiling in preparation for your snow foam. It's important not to skip the pre-clean and go straight to snow foam for the same reason you wouldn't miss the pre-rinse - you want every cleaning product to get to work where it's needed and try to minimise product wastage as much as possible. So, always apply your Citrus Power liberally, and rinse from the top down.
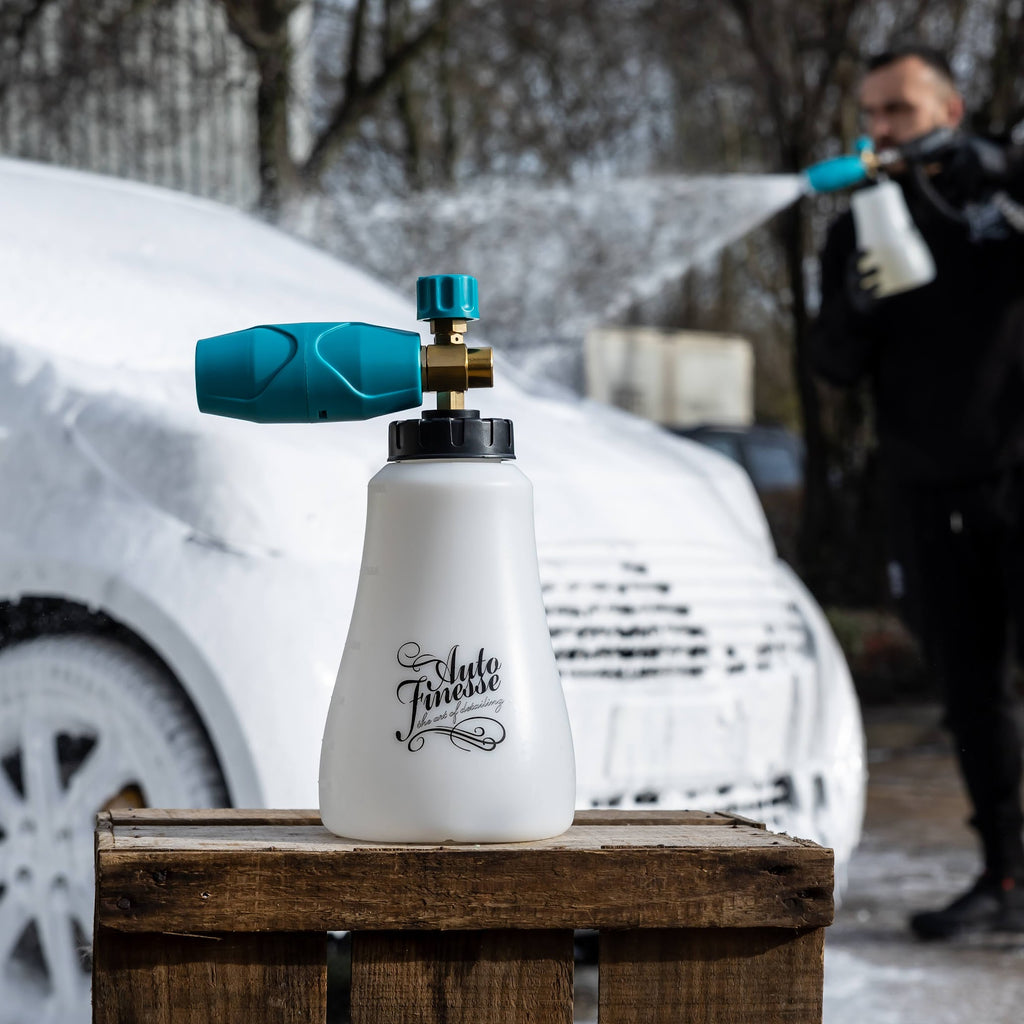
The second stage of the pre-wash is using Avalanche Snow Foam to remove bonded particulates. Avalanche is a citrus-infused cleaning agent, but it's different to your pre-cleaners because it's designed to linger for the maximum amount of time on the surface. This effectively means that it works on breaking the bonds of the most stuck-on contamination for longer, giving a deeper clean on the more embedded grime.
Like every other surfactant-based aqueous cleaning agent (such as the Verso, Citrus Power, Reactive, Tread and Revolution we've already used), Avalanche is designed to pull the dirt particles off of the surface on a microscopic level and suspend them in the solution - most importantly, away from the easily damaged surfaces - allowing them to be rinsed away safely. Avalanche is also wax, sealant and coating-safe, and will even work its way into all the shuts and panel gaps, deep-cleaning those, too.
To apply our Avalanche we use a Snow Foam Lance attached to our pressure washer. This professional device is essential because it physically uses the water pressure to push the solution through a special metal gauze to activate the cleaning agents, and whip up the solution into a thick, lingering foam.
First, we add around an inch of Avalanche concentrate to our Foam Lance bottle, before topping up with water. Then the snow foam is applied to vehicle from the top down - doing it this way avoids spreading any contamination upwards. Remember that the lower down the vehicle, the more soiling you'll typically find, and you don't want to move this up to any less soiled areas.
Once the entire vehicle is covered, we let the Avalanche do its job by leaving it for as long as possible, but crucially without letting it dry. A good pro-tip here is to keep an eye on the glass, as this will start to dry out first. While you're waiting, you can help the cleaner get into the most awkward dirt traps, such as fuel flaps, around badges and along weather strips. While you wouldn't agitate on whole panels, by now the largest particles will have been removed, so a little agitation is safe, and helps the solution fully penetrate awkward areas.
Once again, this type of agitation isn't about mechanical cleaning, but making the best contact and refreshing the solution. For this task we used a FeatherTip Detailing Brush, which is soft enough to merely refresh the solution, rather than physically scrub the surface. Finally, we rinse the vehicle - again from the top-down - being sure to flush out any panel gaps.
Again, a professional contact wash is all about minimising the risk of scratching and marring, while effectively removing any remaining soiling. There are various safety precautions we use for damage limitation, both when it comes to the products we utilise, and the actual process.
The first is perhaps the most famous - the detailer's "two bucket' wash. The idea here is to use a duo of Detailing Buckets (and not the one you've already used for your wheels), to avoid the spread of contamination. One bucket is for your wash solution, and the other filled with plain water for rinsing out your wash mitt after every pass on the vehicle. This simple measure helps prevents cross contamination of your buckets, and essentially stops grime being transferred back to the vehicle. As an extra precaution we always use professional Detailing Buckets because these not only contain grit guards to stop sunken particulates getting back onto your wash media, but the large 20-litre capacity also means that there's a larger ratio of water to grime, so there's less chance of any harmful particles being recirculated back to your mitt.
As for the products used, first you'll need a professional wash mitt. This type of wash media is designed for the same type of non-scrubbing agitation we've already used during pervious stages. We're not looking to mechanically clean paintwork and other surfaces with our mitt, just to apply and move our shampoo solution around, helping it to do its job of breaking down and lifting the last of the grime. Our selection of wash mitts are constructed from non-scrub materials such as lambswool or microfibre and designed to pick up the particles that your shampoo pulls from the surface, locking them away deep within the material, taking away their ability to inflict damage.
Here on the Porsche, we've opted for a Plush Wash Mitt (again, not the one we leave for use just on wheels), which is particularly ideal for sensitive paintwork and made from microfibre designed to absorb plenty of shampoo solution and glide freely across every surface.
Lather Car Shampoo is our choice of cleaning agent here, and that's for a few good reasons. First of all, it's an extremely powerful cleaner. It uses both surfactants and water molecules to rip bonded grime off surfaces, before suspended them in its own solution for safe, swirl-free rinsing. Second, Lather also contains a whole host of advance lubricants, which allow any heavier particles to slip safely over surfaces without scratching. And, perhaps most important of all in this instance, Lather is what's known as a pure cleaning agent, denoted by the fact it contains no waxes, shining agents, fillers or coatings. In the real word that means it leaves nothing behind after the wash, in our case we'll be polishing the vehicle, so there's no advantage in having a shampoo (such as Wash N Gloss) that installs protection or fills defects in the surface. These kinds of products are ideal for maintenance of course, but we don't need the extra features here.
A few capfuls of Lather in our wash bucket is all we need to get plenty of deep-cleaning suds, but it's worth noting that Lather is also an economical dilute-to-suit cleaner - you can add a bit more for heavier soling, and a little less for light cleaning.
When performing our contact wash, we always tackle the cleaner parts first, once again this limits the spread of contamination from dirty to less dirty areas. This means that, although you're typically washing from the top down, it's best to be selective about the order in which you wash the panels. We'll start on the roof, before taking on the windows and upper-sides, and then move on to the bonnet, front bumper, lower sides and finish on the rear. Washing in straight lines is also crucial, avoiding circular motions also helps limit the risk of inflicting swirl marks.
Rather than routine maintenance, a "decon' wash is a process reserved for bigger details and deep-cleans - especially prior to polishing and paint correction processes. This is a process designed for periodical decontamination - the removal of the most bonded deposits that washing alone isn't able to remove. The types of decontamination here range from sharp ferrous metal, sticky tar and glue residues and environmental contamination including mineral and protein deposits from rainwater, tree sap, bug splatter and bird droppings. Each of these has their own stage, making full-decontamination a 3-stage process, using specific detailing products for each step.
The first stage is embedded metal removal. Again, this sort of contamination is chiefly derived from brake dust flying around in the air and ultimately embedding itself into paintwork. There are other sources that cause iron contamination, train lines are one of the largest, but the big one is always the abundance of brake dust produced by your car, and the others on the road.
As with wheels, iron contamination in paintwork must be chemically removed using a product capable of dissolving metal into a solute (a combination of the metal atoms and the solution) which can be safely rinsed away. Instead of using Reactive, which also contains surfactants and degreasers intended for wheels, here we are using Iron Out Contaminant Remover. Safe for use on all paintwork and glass, for our purposes here you can think of Iron Out as an isolated version of the concentrated chemical cleaner found in Reactive, without the cleaning agents needed for the heavy grime and road films - here we're using Iron Out on a surface that's already free of general grit and grime. We're just looking to remove the embedded metal shrapnel which, as you can imagine, we don't want pulled out and whizzing around on the paintwork on our machine polishing pad later.
Iron Out is sprayed directly onto the surfaces, where it reacts to turn blood red, indicating that the solute has been formed and it's ready to be rinsed away. To help spread and refresh the solution, giving it a little more bite, we also use a microfibre Polish Pad to lightly agitate our Iron Out over the panels before rinsing away the contamination.
The second decontamination stage involves using ObliTARrate Tar & Glue Remover to cut through sticky residues. This product is made up of a range of special solvents which, in a similar way to your Iron Out, dissolve and suspend sticky residues, allowing them to be wiped away with a microfibre cloth. Using this product to directly target areas, especially the bumpers and lower sides, where you'll typically find the sticky contaminants, is the key to success. Again, you can spread and agitate the solvent using a non-scratch microfibre Polish Pad, but the key thing to remember is to rinse and re-wash the area using your Lather Car Shampoo straight after. This process neutralises the solvents and stops them interfering with the next stage.
The final decontamination process is the removal of protein and mineral deposits, along with any other left-over contamination - basically all the unavoidable contaminants that come from the environment and bond to the paintwork on a microscopic level. For this stage we use a Clay Bar and a little Glide Clay Lube to physically pull the particles from the surfaces. It's important we tackle every inch of the paintwork and glass with the clay, ensuring it's sufficiently lubricated with glide to stop it sticking, and to reduce the chance of marring the surface. Running the clay lightly over the paint with hardly any pressure at all will be enough to pull out any remaining contamination. You can actually feel the difference in resistance as you work over each panel to create a smooth, glass-like finish. Again, a quick re-wash of the paintwork is also beneficial, just to remove any lube residue before drying.
Drying your car thoroughly isn't just important on a big detail, it's a stage that many skip during routine maintenance without realising just how vital it is. The truth is that it's crucial to dry after every wash because tap water - the stuff you're using to clean your car - contains all sorts of impurities that, if left to dry naturally, will be deposited all over the most sensitive surfaces. The best-case scenario here is that these impurities will leave harsh watermarks that will need to be removed with a quick detailer, or even extra polishing… and the worst is that these can scratch the paintwork itself.
The quickest and easiest way of avoiding this risk is drying the whole car by absorbing the water and the impurities together, as opposed to simply pushing them around the surface. To do this effectively you need a dedicated microfibre drying towel. In this case we're used our non-scratch Silk Drying Towel to quickly remove all the water from the panels, before following up on the more awkward areas - such as door jambs and wheels - with a soft, absorbent Ultra Plush Microfibre cloth. It's just a case of passing these accessories over each area and letting the microfibre weave do all the work.
It goes without saying that machine polishing is an in-depth process, and it requires a little preparation to get the very best results. This interim stage is not only about safeguarding other areas of the vehicle, but inspecting the paintwork itself to see what can be carried out safely, and what polishing products to use along the way.
In this instance, we brought the Porsche into the polishing bay and removed the wheels. This part has nothing to do with polishing the paintwork itself, but simply gives us access to finish the inner arches, and better access to the wheels, which we'll be machine polishing later.
Next, we took the extra time to mask up the vehicle fully, including the optional step of covering all the windows and trims. The point of masking areas such these is to both prevent and staining and damage to soft, sensitive materials by accidentally running over them with your machine polisher, and to help prevent damage to the polishing pad itself. Rubber and some plastics are notorious for picking up polish stains, masking them up eliminates the problem. Masking the windows fully is just another way of preventing headaches later, all we're doing here is preventing polishing dust from falling into hard to-reach areas, so there's no need to do a whole load of extra cleaning. This is a process we always assess on a job-by-job basis.
With the Porsche taped up, we moved onto a full paint inspection. What we're doing here has the dual purpose of looking for any damaged areas that shouldn't be polished, and actually show us the extent of the swirl-marks and damage we're dealing with. As you can see from the video, this car was suffering from major swirling over the majority of the paintwork.
Getting the full extent of the defects that need to be removed indicates the products and accessories you'll use during the machining stage, so it's vital to be thorough in the inspection. It's also the reason why we always turn off the main lights and use a concentrated spotlight like our Swirl Spotter Detailing Light to highlight the defects.
Like all professionals - and because it's not our car where we already know the history - there is one other stage we carry out during inspection, and that's using a paint depth gauge to measure multiple panels over the whole car. This not only gives us an indication of the amount of clearcoat or paint we're working with (there has to be enough to actually polish, it's best to avoid areas with seriously low readings), but some high readings can also reveal major repairs involving body filler, resprays, or smart repairs. Here we're also looking for other areas of paintwork to avoid, such as those that have been blended in during a repair - we don't want to polish away the blend to reveal any hard edges.
By talking multiple readings around the bodywork we can make a mental map of the vehicle which helps get the best, and most importantly safest, results. In our case, we can see reasonably high readings over the whole vehicle, indicating that this car has had a little paint over the years.
Machine polishing is all about balance, we're looking to find the finest possible "combo' - a combination of abrasive compound and machine polishing pad - that removes the defects effectively but without being too aggressive - we're looking to preserve the clearcoat/paint left on the car as much as possible. This is why you should always start with a test patch using a lighter compound and work up slightly coarser compound to find the very first (the finest coarse compound) that has the right amount of cut to remove the defects. When polishing you work back from there, using the coarsest compounds to cut out the defects and finishing with progressively lighter compounds to refine the paintwork down. For a full explanation of how paint correction products work, see our article The Basic Guide To Machine Polishing.
Of course, experience plays a part the test phase, too. Our master detailers will already have a good idea of what compound to use just by looking, but they will still test due to differences in every vehicle, like how soft the paint is and what material is underneath the paint. It's important not to be too aggressive because softer paint is easier to cut than hard paint, so a lighter compound will essentially do the same job. Plastic panels also dissipate heat differently than metal, so all this has to be taken into consideration when picking your compounds.
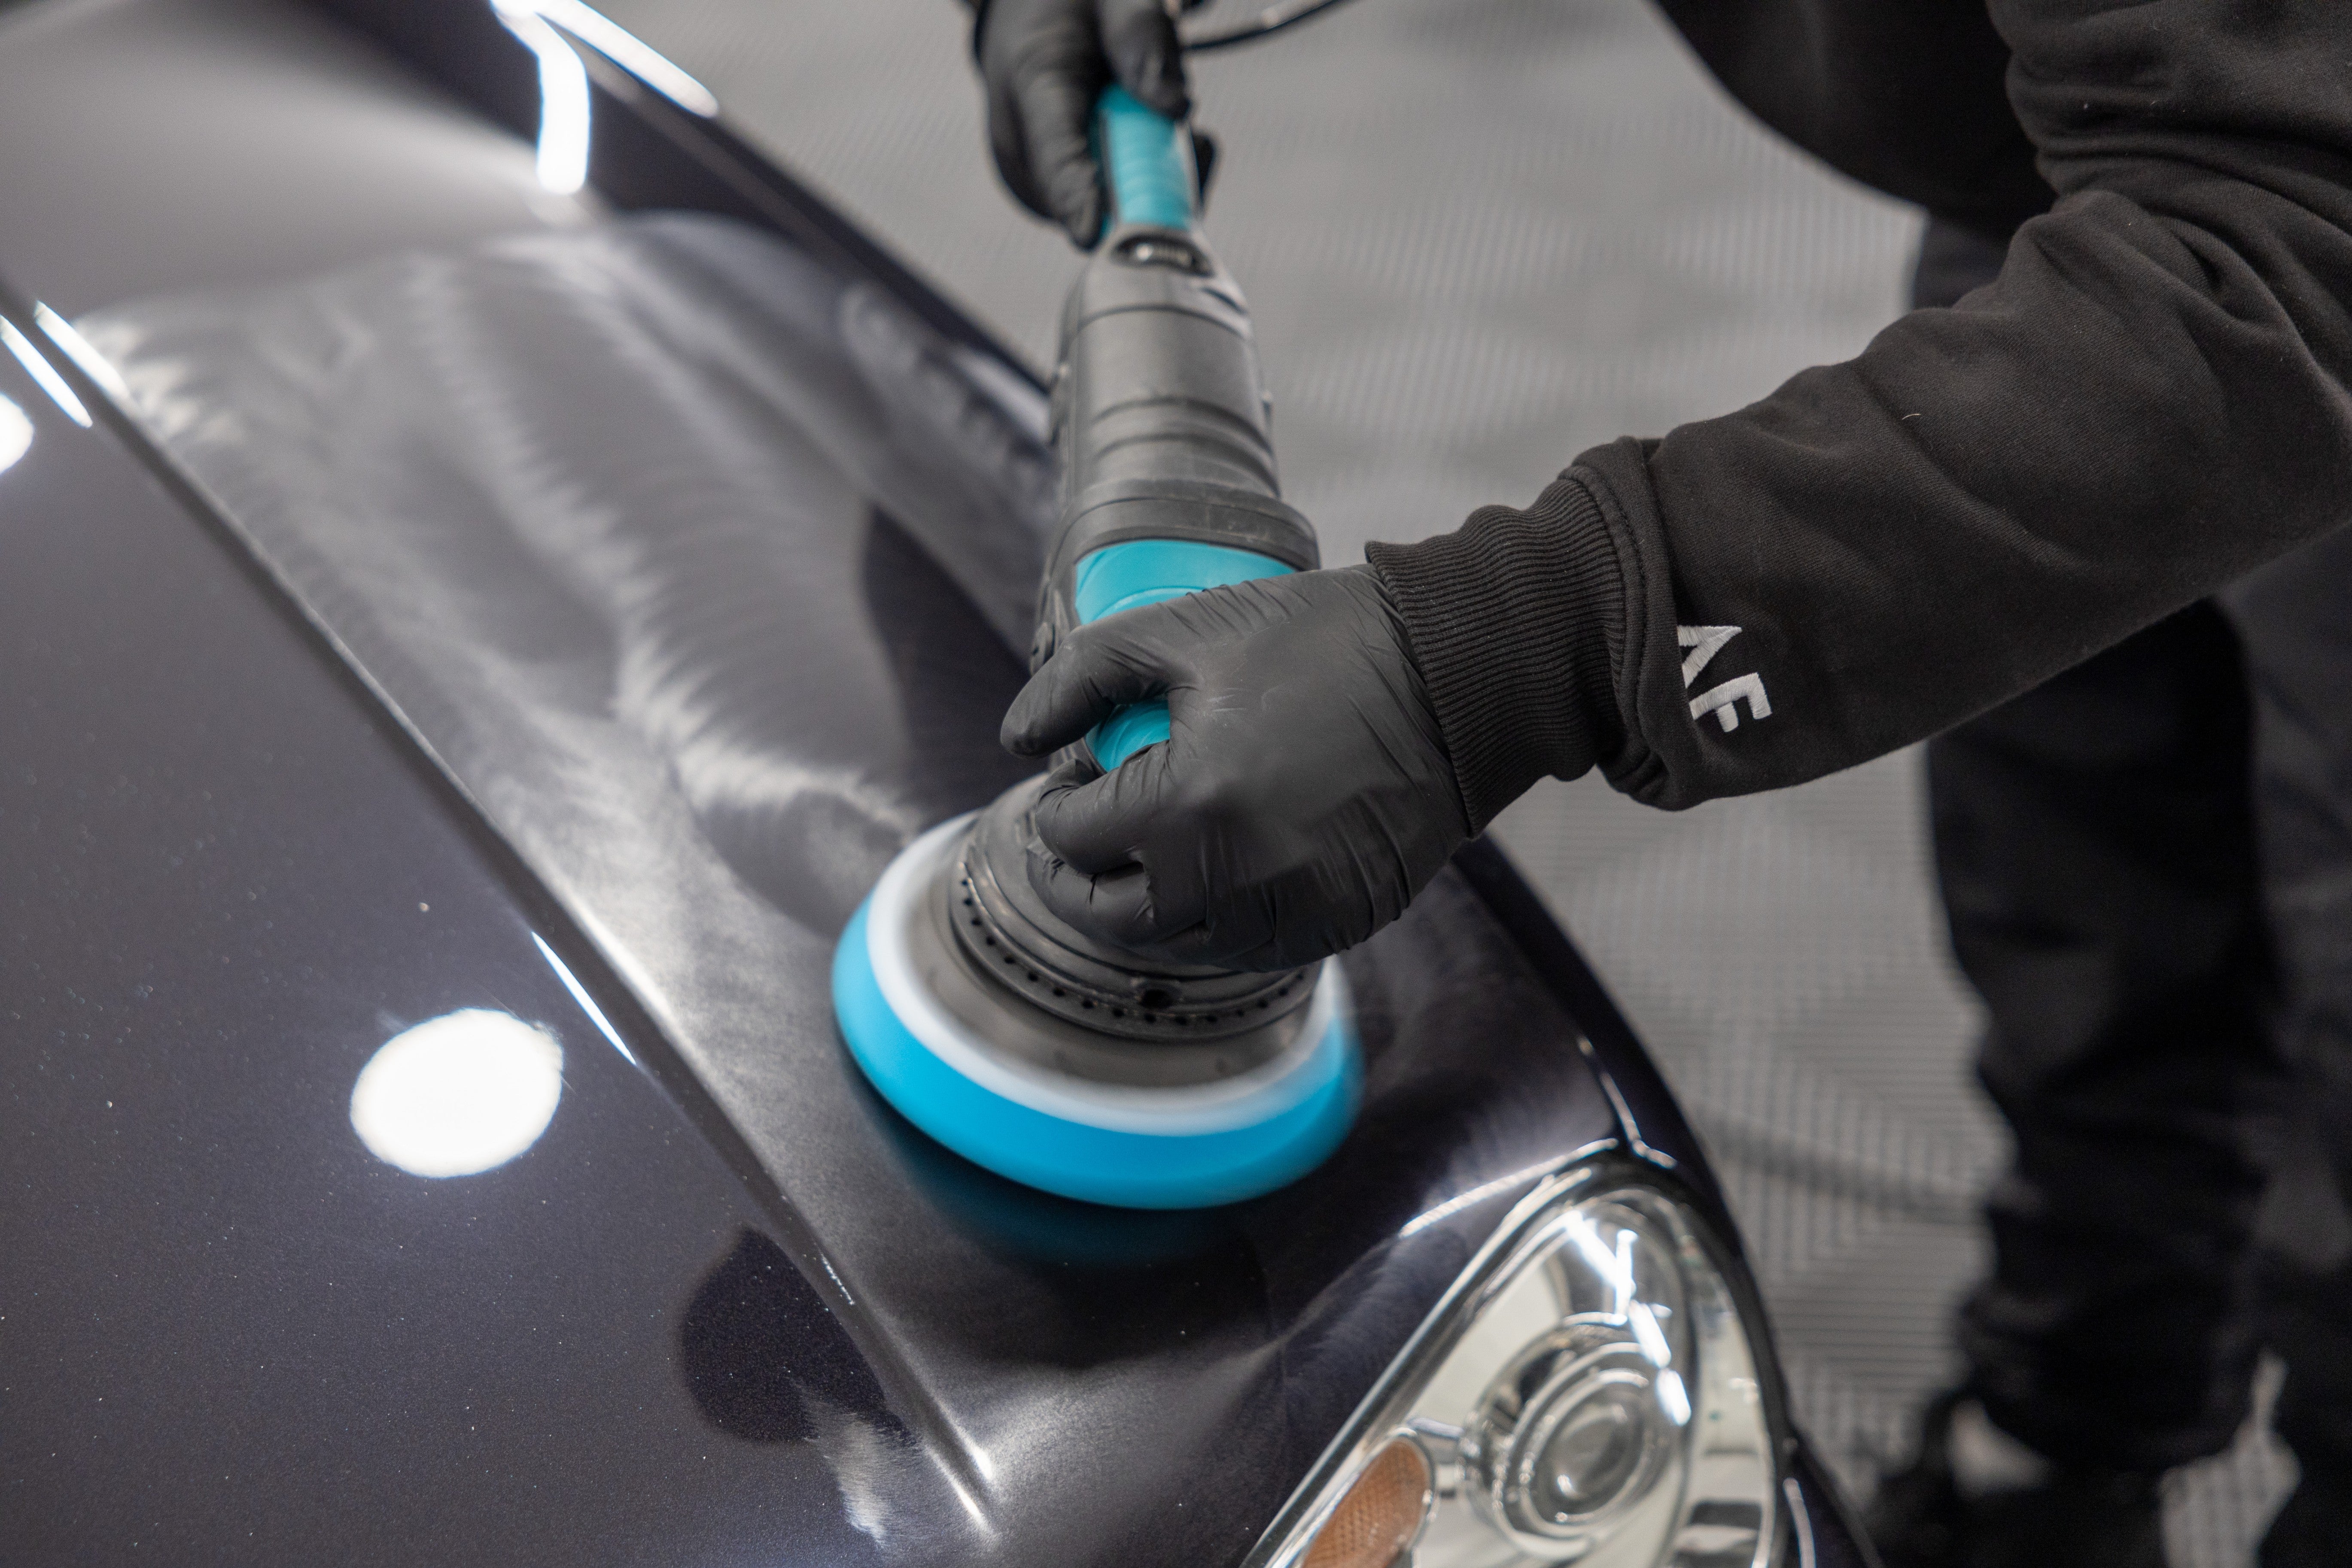
On our Porsche here, and just through detailing experience, One Step All-in-One Compound was our first port of call. This advanced compound is not only capable of cutting out the harsh swirling, but on our test patch (with a medium Revitalise No:2 Foam Pad), we could see that it finished down to an extremely glossy finish, too. One Step is unlike any other compound in this respect, it starts off as a coarse compound and breaks down to a fine finishing polish as you work it through. Unlike traditional compounds where you'd have to use stages of progressively finer compounds to get the finished result, with this advanced compound you can get the same effect with a single-stage machine polish. One Step and a medium pad was used for the entire polishing stage here, utilising a DPX Dual Action Polisher for larger panels, and a smaller MPX Dual Action Polisher (with a Revitalise No:2 Spot Pad) where space was tighter.
As you can see in the video, we have to polish every part of the paintwork, completing small areas at a time, and checking periodically with our detailing light, until the whole car is complete. On this car we could also use One Step and an MPX to fully restore the headlights and rear clusters. The main point here though, is that the actual route you take isn't important and largely due to personal preference. More eagle eye'd viewers may have also noticed that we laid a tape line halfway down the door before machine polishing - you don't need to do this yourself, we just used this as an easy way to highlight the difference before and after polishing, and show you the results that can be achieved.
With the bodywork complete, we moved onto the wheels. Again, a full inspection is in order to assess if there's any damage to the lacquer and what, if anything, can be done to lift the finish. In our case the wheels were suffering from a few light defects on the faces and barrels but, most importantly, seriously lacking the when it comes to gloss.
Although we could have hand-polished the wheels here, because of the relatively flat design a light machine polish with an MPX and a hand polish on the more awkward areas like bolt holes would be the most effective route. We used a combo of Tripple All-in-One Polish and a soft Revitalise No:3 Spot Pad because the light abrasives in this polish would not only make short work of the defects but, being an "all-in-one' polish, it also contains deep cleaning solvents to remove oxidation, along with carnauba wax to leave behind a layer of ultra-glossy wax protection.
Later, during the final finishing stages, we'd also utilise Mint Rims Wheel Wax, a high-gloss, high-temperature synthetic wax ideal for adding extra protection and even more shine. This product is ultra-resilient to brake dust and road grime, easy to apply using a Foam Applicator, and even easier to buff off the residue with a Microfibre Work Cloth.
Before moving onto the interior and finishing stages, there was one other cleaning job that needed to be completed and that's the engine bay.
Now, if you're a regular visitor to our channel you'll know that we often deep-clean the dirtiest engine bays at the very beginning of the wash stages using a combination of Eradicate Engine Degreaser, Verso All Purpose Cleaner and a pressure washer. But, whether this process is necessary, or even possible, is something that needs to be judged on a job-by-job basis. An engine bay deep-clean in this way isn't something suitable for every single detail - particularly on a car like this Porsche where there's a lot of electrical components that need to be avoided.
On assessment, we also knew that only a light clean was needed here anyway, using a little 1:10 Verso and a Hog Hair Brush. Here we can simply spray-on, agitate and wipe away the grime with a microfibre. For quickness and to be extra thorough, we also used a steam cleaner to help push the Verso into all the harder to reach areas, but you don't have to do that at home. In reality a little patience and your brush will do most of the work.
Now for the start of the final stages, which begins with tackling the inner arches. Dressing these now and refitting the wheels allows you to clean the interior, add protection to the exterior and perform all those essential finishing touches with the car back on the floor. It's not as much of an issue for us as the vehicle is on a ramp, that's why we haven't, but it's much better than crawling around inside while your pride and joy is up on stands.
But, why do we actually dress the plastic arch liners in the first place? Well, it's as much about adding a little protection as it is restoring the plastics and making them look good. Our Revive Trim Dressing is a silicone-based restorer that will bring back the original deep colour, but will also keep them looking better for longer. This water-resistant product is easy to apply - we just used Microfibre Applicator to cake on a generous amount, waited for 10-miniutes for it to cure, and buffed away any excess. Granted we're using a little more than we would when dressing more noticeable matt plastics on the exterior, but on areas like this it can be a good idea to let a little more product soak in.
You'll see in the video that we also used a little Revive on a detailing swab to address the faded plastic grilles, the only other matt plastics on the whole vehicle. Again, this is different from car to car and will dictate the products you use, not to mention how you use them.
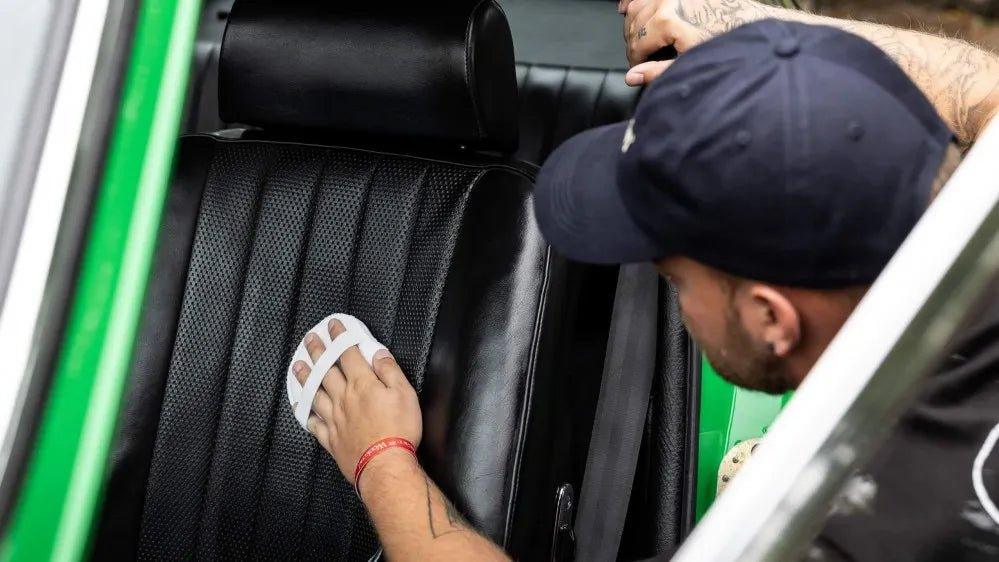
It has been said that Interior Cleaning is an art in itself, and what you have to do to get the desired results will not only depend on the level of soiling, but all the materials used by the car manufacturer. For a full rundown of every product and what its used for we'd recommend checking out our Ultimate Interior Cleaning Guide.
What's most important here is that this Porsche is very well kept and only required some light cleaning, which is more akin with routine maintenance than intensive deep-clean where we may be pulling out seats and wet vacuuming mould out of the carpets. In this case just a few detailing products was all that was needed for a great result. If however you feel that a full deep-clean is in order, you may want to consider doing this before you polish the exterior, just to cut down on the risk of rubbing up against your freshly-polished panels with your vacuum or while you're getting in and out of the car.
Anyway, the first step for us was to set aside floor mats and fully vacuum the carpets and seats to remove any loose debris. Then we can take a FeatherTip Detailing brush to remove any dust that has built up in the awkward and hard to reach areas, places like around the steering wheel, dashboard recesses, doorcards and vents. The soft brush gently removes this dry contamination without scratching, allowing us to vacuum these away as we work.
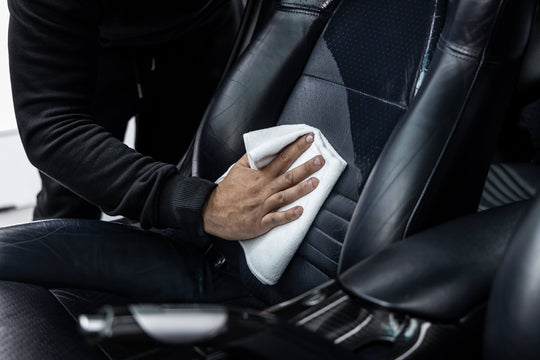
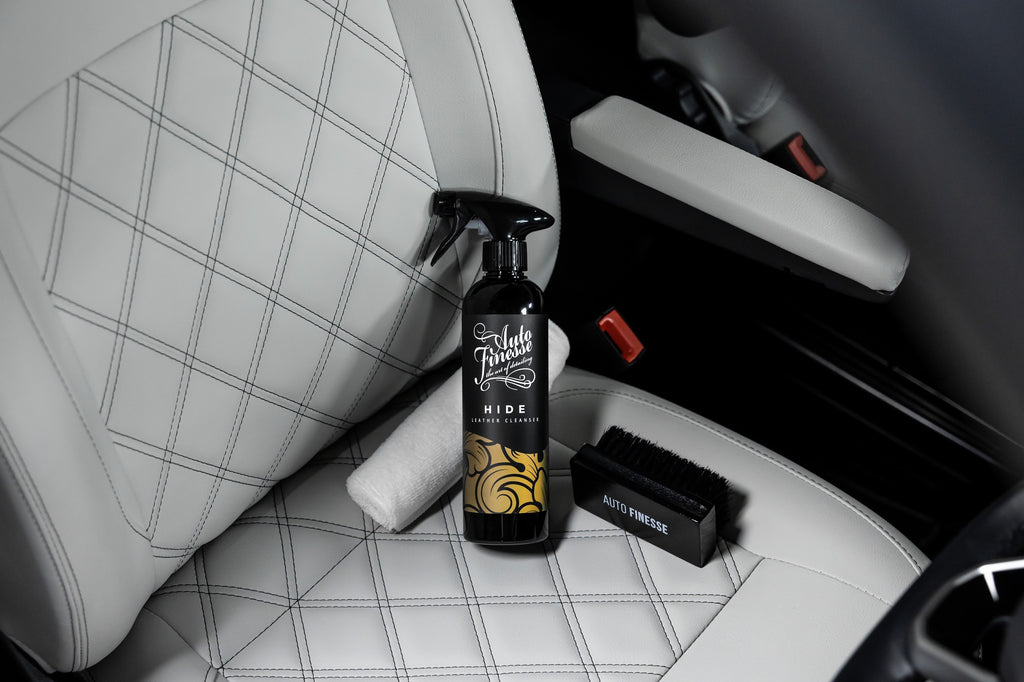
Next, it's on to using our cleaning agents to fully clean and sanitise the surfaces, as with any detail it's vital to get the correct cleaning product for the area you're tackling. In our case Hide Leather Cleanser is the perfect product to remove any ingrained dirt from the seats. This glycerine-based cleaner is mild enough for regular use on sensitive leather, but will easily draw out any grime from the under the surface. Like most of our dedicated cleaners it uses special surfactants and degreasers to pull out and surround grime, allowing them to be safely wiped away. Spray on, agitate with an Upholstery Brush and wipe to get a subtle satin finish.
Total Interior Cleaner is our other cleaning agent for this job. Unlike many harsh, all-purpose cleaners it won't dry out or damage surfaces making it suitable for regular use, but it still contains surfactants with the power to cut through the grime. For targeted cleaning, like on the dashboard, around the wheel and the other interior trim, we apply Total directly to a Microfibre Work Cloth and wipe away the grime. For other larger areas, such as carpets you can spritz on Total directly, agitate with your Upholstery Brush and use a microfibre to wipe away the residue.
With the cabin complete we can tackle the floor mats, typically the dirtiest part of any interior. In most cases a thorough vacuum, followed by a few spritzes of Total will draw out the grime, allowing it to be wiped away in the same way as the interior carpet. In our case we have a wet vac, so we used that to for a slightly deeper clean, but if you haven't got one of these, a little Total and an Upholstery brush will get the best results.
Finally, we completed the "boot' which on a 911 is not only under the bonnet, but cleaned in a way that's a cross between the interior and the engine bay. Like we said, all cars are different, on most we'd clean the boot as part of the interior, but because it's completely separate here, we've left it until last. In this case we tackled the carpet in the same way as the cabin - a vacuum, followed by a little Total. We took on the plastics in the same way as the engine bay - Verso and Hog Hair Brush.
Now we're getting to the final stages where we not only add paintwork protection but get every surface looking its absolute best. For maximum gloss - and simply because this rare car deserves the very best - we opted for our flagship Desire Car Wax. We've said it a few times already, but we'll say it again - the car and the desired result will always dictate the product used. When it comes to protection, how the vehicle is used is also a consideration. If it's a daily driver you may be looking to opt for ceramic coating like our Caramics Paintwork Protection Kit, or a hardy sealant like our Graphene Filler Liquid Wax, both will give a slick, shiny finish. For a car like this though, we think you just can't beat the warm glow that can only come from a natural wax. Dare we say it? In this case the looks side of the argument is perhaps even more important than the durability. In any case, Desire contains 54% T1 Grade Brazilian carnauba, which is an extremely high solid wax content, so it not only adds protection that lasts for up to 6-months but also an extreme wet-look finish. A real favourite among show car owners!
Before we can break out our wax though, it's important to make sure the surface is ultra clean. Remember that between now and the polishing stages - while we've been cleaning and taking care of other tasks - dust and debris could have settled on the paintwork and you don't want this affecting the visual finish of your wax. The answer is a final wipe down with our Finale Quick Detailer and a super-soft Ultra Plush Microfibre. Just a light spritz is needed on each panel to gently lift any dust, before it can be wiped away and the paintwork lightly buffed.
With a totally clean surface (which will be optimum for wax bonding), we can finally apply our Desire using a soft sponge Waxmate XL. In a controlled environment like this, there's no problem applying the wax over the whole vehicle before buffing off after 15-minutes or so, but you may choose to apply and buff one panel at a time to make life easier, especially when working outside.
The key to perfect wax application is to get it on there in small overlapping circles, and to try and spread the wax as thinly and evenly as possible. You only need a very thin layer over the surface, any more than that will be removed when you buffed off, so essentially laying it on thick is just wasting your wax. It's always a good idea to add another coat for even more gloss and protection, but this needs to bond to the first thin layer, so always wait 3-4 hours in-between, so the first layer can fully cure.
Here we're using a Micro Tweed Microfibre for the buffing, a cloth designed specifically for removing wax residues as safely as possible. The special microfibre weave collects residues in the special pockets in the material to help prevent clogging and get the best possible finish.
It goes without saying that some details have different endgames, and every car is different in design, and both of these considerations will tell you the products you need to add those all-important finishing touches. Whether that's restoring plastics with Revive Trim Dressing or Dressle All-Purpose Dressing, topping up ceramic protection with Caramics Gloss Enhancer or Caramics Glass Cleaner, or polishing brightwork with Mercury Metal Polish, we'll say it once again - the specific job always dictates the detail.
For the Porsche our needs are a little more traditional and we only require two all-time detailing staples that are perhaps the most commonly-used finishers out there - Crystal Glass Cleaner and Satin Tyre Crème.
Now, in most cases we'd complete the vehicle glass as the very last step, but we flipped that around here because it made sense to get the rest of the car completed before refitting the freshly waxed wheels and dressing the tyres, that way there's a minimum of unnecessary contact with the finished vehicle.
First, the final cleaning of the glass inside and out, this process is crucial to remove any dust, smears or fingerprints that have accumulated during the rest of the detail. Basically, after all the work put in, you don't want streaky windows detracting from the rest of your detail.
It's a quick and simple job with Crystal, this fast-flashing solvent-based formula melts through sticky residues and lifts away dirt and dust, allowing it to be wiped away without leaving smears. A couple of spritzes on each piece of glass, followed by a good buff is all you need. Here we're using a Superior Waffle, which is a specially designed glass cleaning cloth. Again, the premium performance comes from the design of the special weave, giving this super-absorbent microfibre towel a huge effective surface area, and plenty of pockets in the material for picking up grime, residues and debris, keeping it away from the surface and eliminating the chance of smearing.
Finally, with the wheels back on, we can dress the tyres using Satin Tyre Crème. This water-based product is ideal here because it leaves a subtle, new-look satin sheen which is extremely befitting of the rest of the detail… although with Satin you can also add another application or two and build up a little more wet-look gloss. In other words, you get to choose.
The great thing about this tyre dressing too, is that it nourishes and conditions the sidewalls, and adds a physical barrier to the elements with UV protection to help prevent fading and browning in the future. Most of all though, it's just a great way to finish off a detail, restoring any patches of faded rubber so it doesn't detract from the rest of the job.
Here we added single application of Satin on each tyre using a specially-contoured Tyre and Trim Applicator, a quick and simple job that can make all the difference to the final impact.
So, that's the in-depth, step-by-step explanation of our Porsche 996 Turbo detail, and don't forget that all these processes can be adapted to many, many vehicles out there. So, with that in mind, we hope you find it useful, and it helps you push your own detailing to the next level. And as for how the job came out here? Well, we think you'll agree, the results speak for themselves…
For more big details, along with a whole load of guides covering every aspect of detailing, check out the Guides section of our blog.